

Installing and Configuring WordPress: A Step-by-Step Guide
WordPress, the ubiquitous content management system (CMS), powers a significant portion of the web. While known for its user-friendliness, setting up WordPress for optimal performance and security requires a deeper understanding of web server technologies and best practices. This guide is tailored for experienced users like web developers, system administrators, and hosting providers seeking a streamlined approach to WordPress installation and configuration.
Prerequisites
- Domain Name: You'll need a registered domain name where your website will reside.
- Web Hosting: Choose a reliable web hosting provider that offers Linux-based hosting with PHP and MySQL/MariaDB support.
- FTP Client (Optional): While not mandatory, an FTP client like FileZilla can be helpful for manual file management.

Step 1: Download and Prepare WordPress
- Visit the official WordPress website (https://wordpress.org/) and download the latest version of WordPress.
- Extract the downloaded ZIP file to a directory of your choice on your computer.
Step 2: Create a Database and User
- Access your web hosting control panel (cPanel, Plesk, etc.).
- Locate the MySQL Databases section or equivalent.
- Create a new database specifically for your WordPress installation.
- Create a new database user and assign it all privileges to the newly created database. Note down the database name, username, and password for later use.
Step 3: Upload WordPress Files
You can choose to upload the WordPress files using either an FTP client or your hosting provider's file manager.
FTP Method:
- Connect to your web server via FTP using the credentials provided by your hosting provider.
- Upload the contents of the extracted WordPress folder to the desired directory on your server (e.g., the root directory for your domain, usually 'public_html' or 'www').
File Manager Method:
- Access the File Manager tool in your hosting control panel.
- Navigate to the directory where you want to install WordPress.
- Upload the extracted WordPress ZIP file and use the file manager's extract function to unzip it.
Step 4: Run the WordPress Installation Script
- Open your web browser and navigate to your domain name. You should be redirected to the WordPress installation setup.
- Select your preferred language and click 'Continue'.
- On the next screen, you'll be asked for your database connection details. Enter the database name, username, and password you created earlier. The database host is usually 'localhost' unless specified otherwise by your hosting provider.
- Click 'Submit'. If the details are correct, WordPress will connect to your database and display a success message.
- Click 'Run the Install'.
Step 5: Configure WordPress Settings
- Provide your website title, desired username and password for your WordPress administrator account, and your email address.
- Choose your preferred privacy settings. For public websites, it's generally recommended to keep 'Discourage search engines from indexing this site' unchecked.
- Click 'Install WordPress'.
Step 6: Secure Your WordPress Installation
Security should be paramount. Immediately after installation:
- Change Default Admin Username: Do not use 'admin' as your username. Create a new administrator account with a strong, unique username and password, and delete the default 'admin' account.
- Enable Two-Factor Authentication: Enhance login security by requiring a second authentication factor, such as a code from an authentication app.
- Update Regularly: Keep WordPress, themes, and plugins up-to-date to patch security vulnerabilities.
- Implement Security Plugins: Consider reputable security plugins for additional layers of protection (e.g., Wordfence, Sucuri Security).

Step 7: Customize Your WordPress Website
Now the fun begins! Explore the following:
- Choose a Theme: Select a theme that aligns with your website's design and functionality from the official WordPress theme repository or reputable third-party providers.
- Install Plugins: Extend WordPress functionality with plugins for contact forms, SEO optimization, performance enhancements, and more.
- Create Content: Start adding your website's content, including pages, posts, and media.
Advanced Configuration for Experienced Users
Fine-tune your WordPress installation for optimal performance and security:
- Caching: Implement caching mechanisms using plugins like WP Super Cache or W3 Total Cache to reduce server load and improve website speed.
- Content Delivery Network (CDN): Utilize a CDN to distribute your website's content globally, reducing latency for visitors in different geographic locations.
- Database Optimization: Regularly optimize your WordPress database using plugins like WP-Optimize to improve performance.
- Security Hardening: Implement additional security measures like limiting login attempts, hiding the WordPress version, and disabling file editing from the dashboard.
RELATED ARTICLES
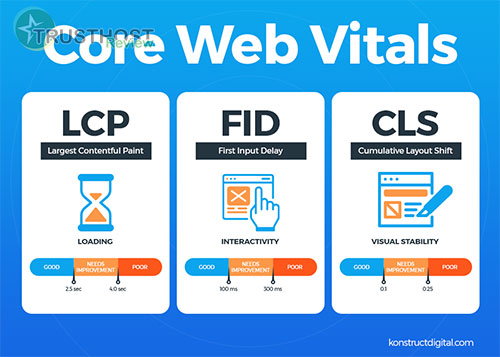
Advanced Techniques for Optimizing Core Web Vitals and Improving User Experience

Installing and Configuring WordPress: A Step-by-Step Guide for Users

Troubleshooting Common WordPress Errors and Issues

Analyzing and Troubleshooting Website Error Logs

The Future of Web Hosting in 2026 and Beyond
The Ultimate Glossary of Web Hosting Terms

Best Hosting for a Scalable Startup

What to Do When Your Hosting Provider Has an Outage
